photoshop

Saturday, October 07, 2006

gel text tutorial FR photoshop-school.org

salut tlm c mon 2eme tutoriel ici et ca ne sera pas en anglais

1- creer une nouvelle image 400*400px
2- ecrire le mot ou la lettre ke vous voulez (la couleur que j ai choisi FFC278)

3- restrize calque , ctrl click sur le calque pour selectioner le contenu
4- creer un nouveau calque l autre est tjr selectioné on va a select -> modifier -> cotract moi j ai utilisé une valeur 7 mais ce depend de votre text biensur

5- remplir la selection avec couleur (FFF5C6)

6- reselectionez le calque de la grande lettre tout en restant sur le nouveau calque de la petite lettre et appliquez un gaussian blur moi jai mis 8.2
7- on merge les deux calques
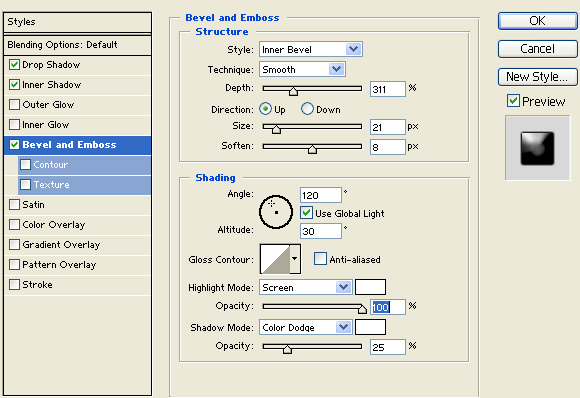
8- on applque effets calques
cliquez les images pour agrandir


resultat


meme technique font different

j espere que vous trouvrez mon tuto bien les amis a+

Friday, October 06, 2006

fgs

Gel Text


race dog

Duotone 'Scarface' effect tutorial


actual levels


updated levels to boost a lil bit the lighting


then apply 2 times sharpen edges

then imege > adjustements > threshold and adjust the way you like

this is my result

Thursday, October 05, 2006

realistic texture wall

hello and welcome to my 2nd tutorial i hope you like it :)

1- create a new document 530 * 310 px fill it with #D6D2CB (background)
2- create a new layer fill it with black , apply clouds (colors black and white) , apply unsharp mask with medium params , change blending to screen apply fresco with brush size 0 brush details 8 texture 2 set opacity to 20%
3- create a layer between to two layers apply clods with white and #C8C7C3 add noise with a small amount blending shange multiply

4- merge visible

5- apply lighting affect

lighting 1

lighting 2

final result

realistic wall

Tuesday, October 03, 2006

photoshop realistic glass orb tutorial

1- create new document 300*300 px white background


2- shoose the orb color and with the elipse tool (u) and maintaining shift button to have a perfect elipse create and center a elipse


1


3- apply innerglow black color and color burn in blend mode


2


4- apply inner shadow color white blend mode color dodge


3


result


4
5- create a new layer , ctrl click the elepse layer to create selection fill selection in the new layer with any color right click layer and select blending option in the tab blending options default reduce fill opacity to 0 and apply inner shadow and satin


5


6


7


result


8


6- create new layer ctrl click elipse layer to create selection ctrl+t reduce the size to 80%


7- select white color as background and select the gradian tool from white to transparent drag from the top of the selection to lil more than half way and release move the ton of selection to the top of the original elipse


and you are done


final result


glass orb final image